Getting Started: LiftBoard
*Watch the video above for a full walkthrough. Use this checklist to follow along, or as a quick reference if you ever need to set this up again (a new season, a new device etc)
This whole process takes about 30 minutes and you only do it once per copy of the sheet.*
Step 1 — Make your copy
Click the "Make a Copy" link you were emailed.
Google will ask where to save it — pick your own Drive, name it whatever you'd like (e.g. "LiftBoard — [Your School]").
This copy is entirely yours. Nothing you do here touches anyone else's copy, and nothing you do is visible to us.
Step 2 — Build the sheet
Click the LiftBoard menu at the top of the sheet.
Click Set Up / Refresh Sheets.
"Authorization Required" will pop up — hit OK and follow Step 3
You MAY have to repeat the first two steps of Step 2 after this if “Program Builder” and “Daily Workout” tab aren’t built.
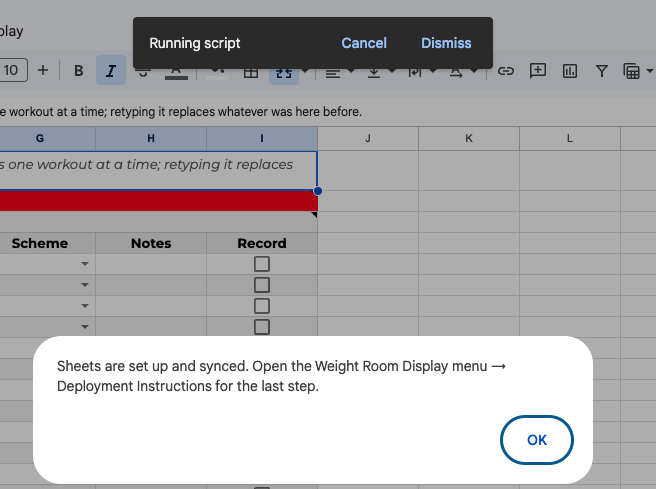
You'll see a "Run Script" popup — this builds out everything the sheet
needs (tabs, formatting, your first Program).You can safely run this again anytime — it never deletes anything you've built.
When it’s done, “Sheets are set up and synced.
Open the LiftBoard menu → Deployment Instructions for the last step.” will pop up.
It means you’re good to go! (see picture)
Step 3 — A heads-up before you click anything
The first time you click anything in the LiftBoard menu (top of the screen, next to Help),
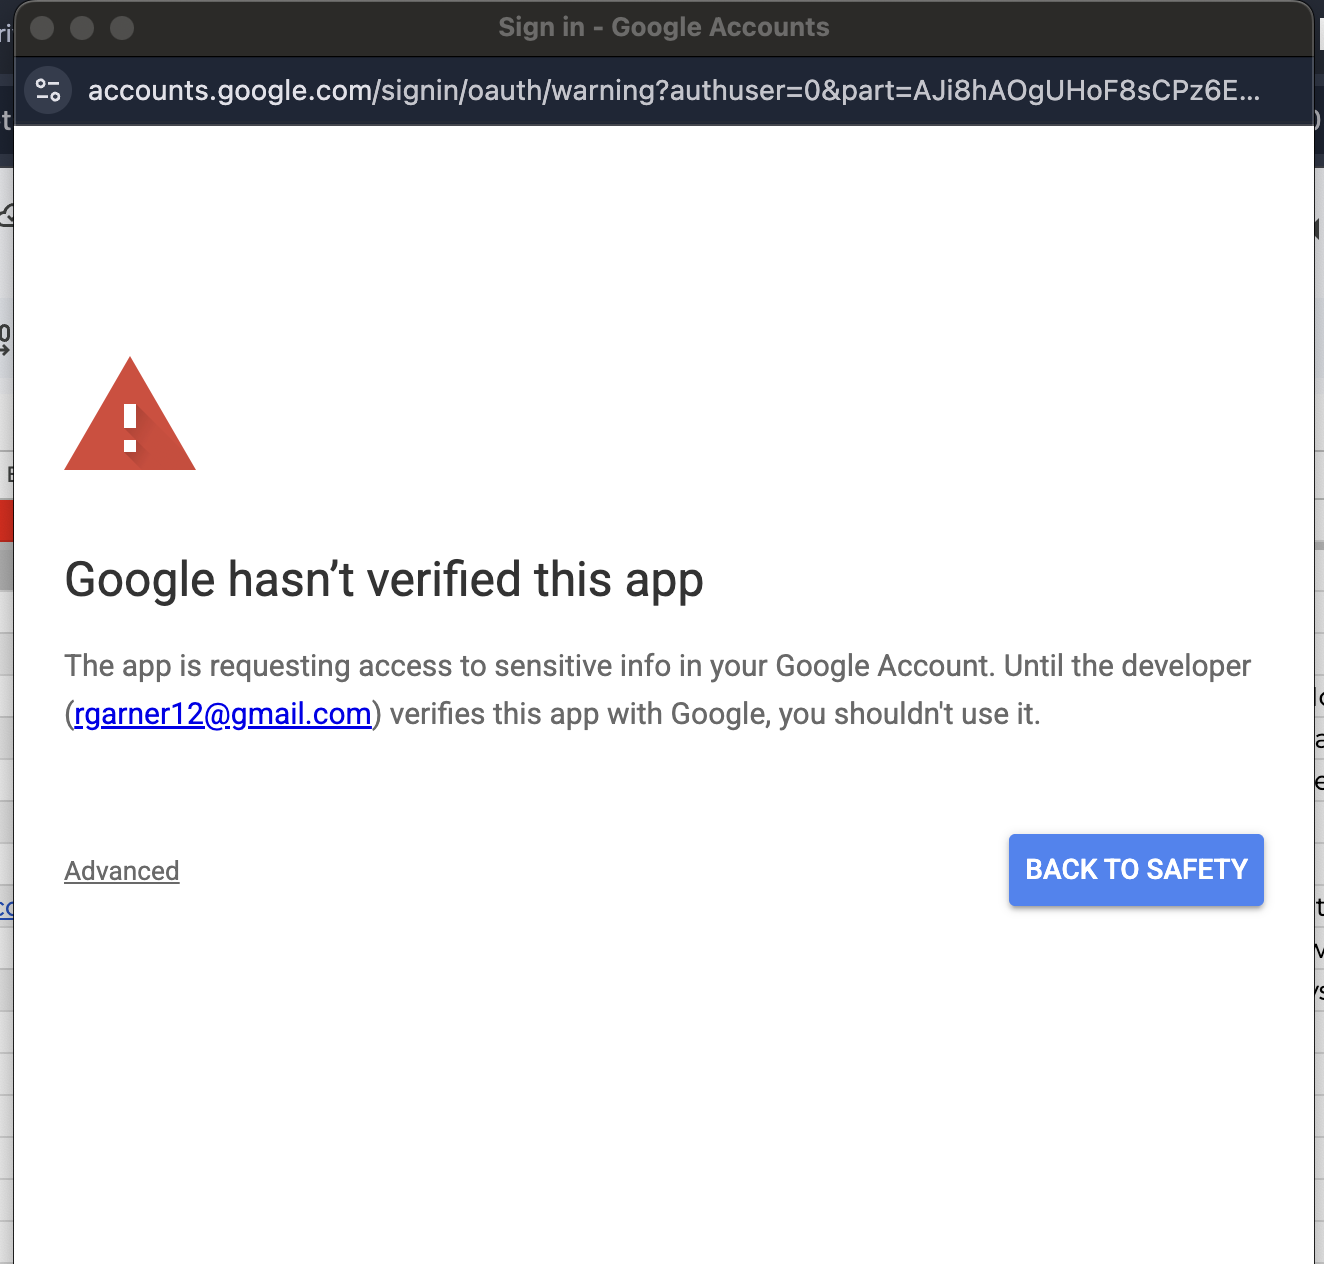
Google will ask you to grant permission for the sheet to run its own automation.Because this is a private tool (not a publicly-published Google app), that screen will say:
"Google hasn't verified this app."
This is completely normal. It doesn't mean anything is wrong, unsafe, or broken — it just means Google hasn't put this specific private script through their public-app review process, which is normal for a tool like this.
To get through it:
Click Advanced (bottom left in gray font)
Click "Go to [project name] (unsafe)"
Click Allow
Select All Permissions and Continue
You may see a very similar screen again later, during Step 4 below (deploying the web app) — same idea, same steps.
Step 4 — Deploy the TV display
This step creates the actual link your TV will open. You only do this once.
Go to Extensions → Apps Script (top menu of the Sheet, not the LiftBoard menu).
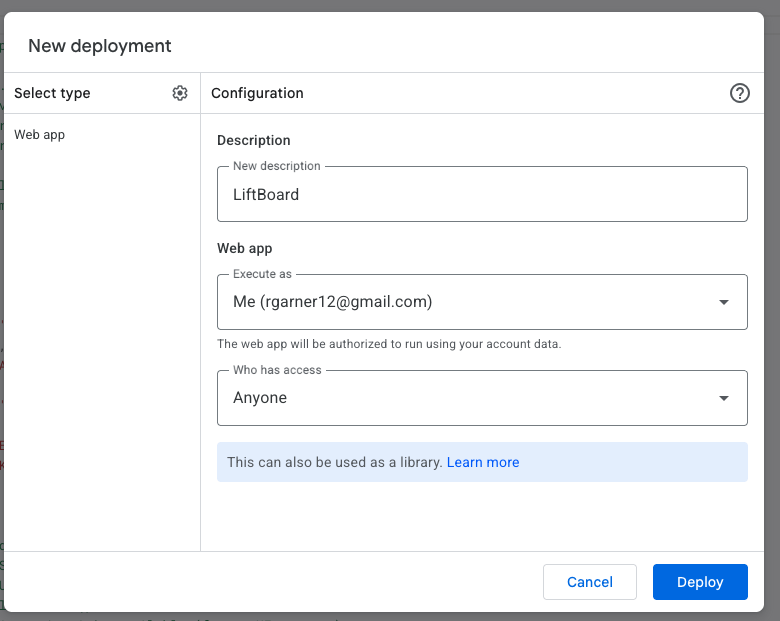
Click Deploy → New deployment (top right in a blue box).
Click the Gear icon next to "Select type" in the top left and choose Web app.
Set Description: LiftBoard
Set Execute as: Me (your email).
Set Who has access: Anyone with the link (or "Anyone within [your organization]"
if you're on a school Google Workspace account).Click Deploy.
You may get an error screen here, click Deploy Again and it should take you to
an “unverified app” screen.If you see the "unverified app" screen again here, click through it the same way as Step 3.
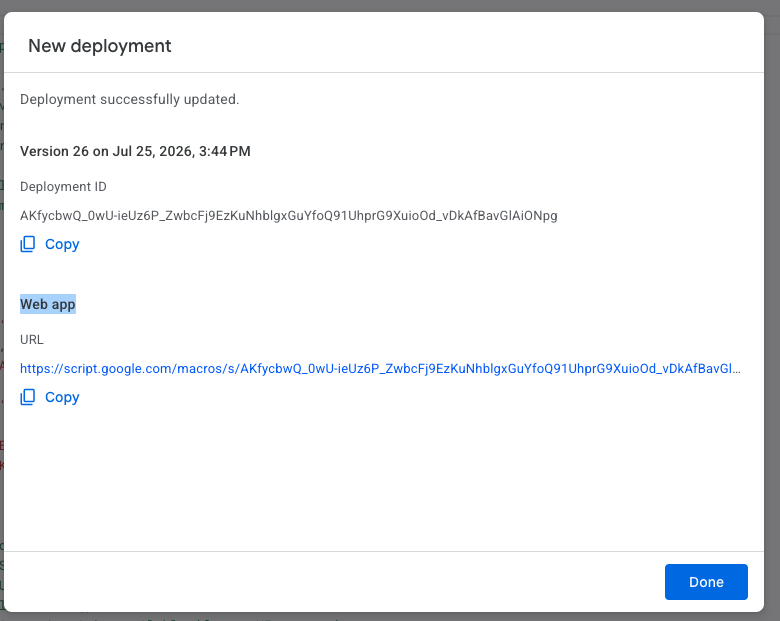
Copy the Web App URL (at the bottom - see picture) shown after deploying.
It looks like: https://script.google.com/macros/s/........./execYou will paste this into the CONFIG Tab
Important: copy this URL specifically — not the address bar of the Apps Script editor tab itself.
Those are two different links, and the editor one will not work as your TV link.IF YOU LOSE THE URL simply go back to Extensions → App Script → Deploy →
“Manage Deployments”→ Copy the URL again from Liftboard Deployment
Step 5 — Save your TV link
Go back to the Sheet and open the CONFIG tab.
Find the row labeled Web App URL
Paste the link you copied in Step 4 into that cell (B10)
Step 6 — Test it
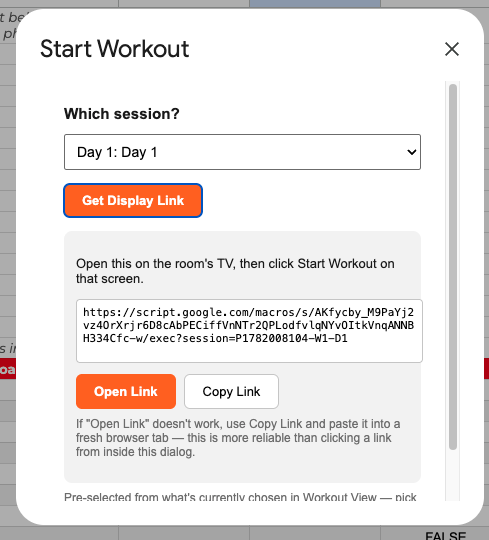
Click LiftBoard → Start Workout.
Pick “Today’s Workout” from the dropdown and click Get Display Link.
Click Open Link (or copy it and paste it into a new browser tab).
Confirm the display loads correctly.
This will be a blank screen without a workout on it. We needed to see if you could open it!
If it works here, it'll work on your actual TV — just open that same link on whatever device is
connected to the screen (a laptop, a Fire TV browser, a Chromebox, etc.) and put it in full screen.
Step 7 — Make it yours
Still on the CONFIG tab:
Team/School Name — shows in the top left corner of the display.
Accent Color — the color used throughout the display (headers, buttons, timers)
Display Font — pick whichever feels right for your room; you can always change this later. I personally use JOST
Logo URL — paste a direct image link, or a normal Google Drive "Share → Copy link" (just make sure sharing is set to "Anyone with the link").
Sound Volume — 0 to 100.
Every one of these updates the display automatically — no need to redeploy anything.
Step 8 — Build your first workout
Open your Program Builder tab — feel free to rename it, e.g. "Football," "Baseball," “3 Day Teams”
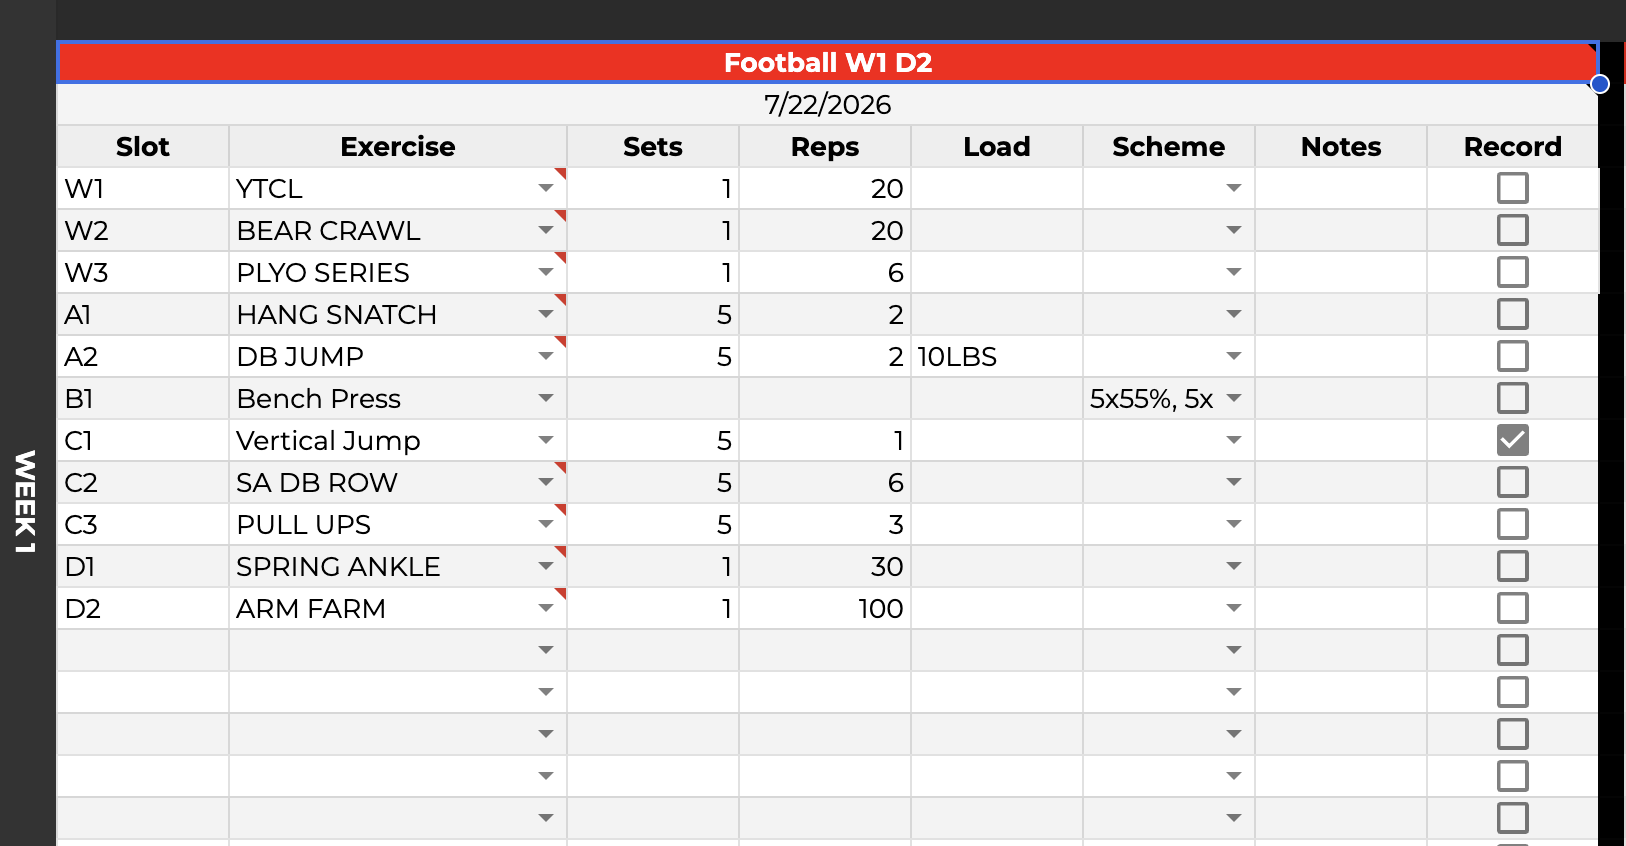
Type a title into a day's title cell (e.g. "Week 1, Day 1"). They are currently labeled “Day 1" “Day 2” etc.
“Football W1 D2” in the picture is the Title Cell.
If you want, you can place a Date below the Title cell
Fill in exercises using the Slot / Exercise / Sets / Reps / Load / Schme columns.
Slot codes are a letter + number (W1, A1, A2, B1...) — exercises sharing a letter get
grouped together on the display. "W" is the code for Warm-Up, which is the screen
shown before the main workout.If you label it 1W, 1A etc it WILL NOT show up on the display
Exercise Dropdown. This will be anything from Exercise Library tab or you can
type in exactly what you want.Type in Sets, Reps, and Load for the % of the day.
To have specific loads/reps on each set, use the Scheme column instead — type sets as either
Reps x Load (e.g. 5x55%, 4x65%, 3x75%) or Sets x Reps x Load (e.g. 1x5x50%, 1x5x60%, 3x5x70%) and it displays as a stacked progression under the lift.To make Custom Schemes - go to the Custom Scheme Presets Tab and type them into there. Label it with a name, and then type the Reps x Load or Sets x Reps x Load of each set. For example: DE Week 2. 5×50%, 5×60%, 3×70%, 3×3×75%. The Sets, Reps, and Load shows up on the display.
Notes and Record
Put in Notes for specific exercises if needed (Cues, tempos, etc) - the notes won’t show up if it’s more than 2 exercise paired together
If you want athletes to record what they get, check the Record box and it'll highlight the movement teal on the display with “record” beside it.
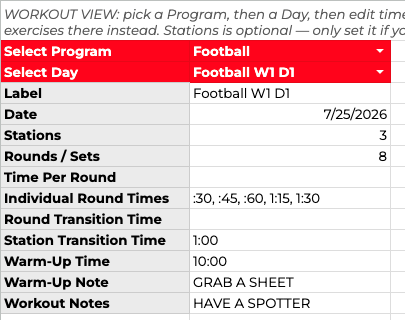
Go to the WORKOUT VIEW tab, pick your Program and Day from the two dropdowns at the top, and fill in your timer settings (Rounds, Time Per Round, Round Transition Time, etc.).
Stations = Number of Stations (EX: Upper, Lower, and Accessory Stations)
Rounds/Sets = Number of Sets Per Station
Time Per Round = Time to complete one set (this would be the time for every round)
Individual Round Times. If you want each round/set to be a different time, use it here.
Ex: 1:00,1:15, 1:30, 1:45, 2:00 would be 5 total sets.
Round Transition Time = Breaks Between Rounds/Sets
Station Transition Time = Breaks Between STATIONS. After finishing Station 1, they get a 2:00 Break.
Warm-Up Time = Time to complete warm up or a countdown to start
Warm Up Notes = Anything you want to say or highlight at the top of the warm-up slide
Workout Notes = Anything you want to say or highlight a the top of the display.
Run Start Workout again to grab the link for that session.
Coaching multiple sports or teams? Use LiftBoard → New Program to create a separate tab for each one — they all share the same Workout View and Start Workout flow, and each can be renamed anytime. You would select the name of the program tab in the workout view (such as football or baseball - then pick the day as shown before.
The Liftboard menu at a glance
The menu groups related actions so the two you'll use most — Start Workout and Set Up / Refresh Sheets — are always one click away:
Start Workout — pick a session (or 2–4 for a side-by-side multi-team display) and get its TV link.
Share ▸ Print Workout Card — a blank log card for up to 5 days, ready to print.
Share ▸ Share Week of Display Links — a page of real, working display links for up to 5 days, handy for sharing a whole week with an assistant coach.
Program Setup ▸ New Program / Add Week to Program Builder.
Set Up / Refresh Sheets — safe to run anytime.
Deployment Instructions — this same walkthrough, if you ever need it again.
Need to display a workout without building a full program?
Every copy also comes with a DAILY WORKOUT tab — a single, standalone card for a one-off session (a sub day, an away-game lift, anything outside your regular plan). It works exactly like a normal day in Program Builder — same Slot/Exercise/Sets/Reps/Load/Scheme columns, same warm-up and circuit support — but it isn't part of a Program's week grid. It shows up as its own option in Workout View's Select Program dropdown, and retyping it simply replaces whatever was there before, since it's only ever meant to hold one workout at a time.
Displaying more than one team at once
If two teams train in the room at the same time, Start Workout can display up to 4 sessions side by side — choose "Multiple Teams" in the picker, check 2–4 sessions in the order you want them to appear, and pick a shared or independent timer. Full detail is in the User Manual.
Going further: multi-station rotations
If you run the room in physical stations — groups rotating between 2-3+ setups rather than one continuous circuit — Workout View has two more fields for this: set Stations to how many physical stations you're rotating through, and Rounds / Sets becomes the round count per station (6 rounds × 3 Stations = 18 total). The display will show "1st Station," "2nd Station," etc. automatically, and there's a separate Station Transition Time field if walking to a new station needs longer than a normal between-round break. This is entirely optional — leave Stations blank and everything works exactly like a normal flat round count.
If something doesn't look right
"Session not found" or a blank display — go back to Step 6 and make sure you're using the link from that specific session, not an old one.
A workout title doesn't show up as a choice in Workout View — click Set Up / Refresh Sheets once; this refreshes everything automatically.
You renamed a Program tab (or the Daily Workout tab) and Workout View still shows the old name — same fix: Set Up / Refresh Sheets.
"Start Workout" gives an error about the Web App URL — double check Step 5; the most common cause is pasting the wrong link (see the note in Step 4).
I tried typing into the exercise list in Workout View and got a warning — that's expected. That list is generated automatically from your Program tab; edit exercises there instead, not in Workout View directly.
Still stuck? Email rgarner12@gmail.com
Liftboard — built for coaches, not developers. If any step here doesn't match what you're seeing, let us know so we can fix the guide.